Don’t Starve: Cave Exploration Guide
Exploration Preparation
Due to the dark and continuously sanity-draining characteristics underground, it is recommended to bring sanity-restoring foods and enough basic supplies for building a fire. Combat underground is also essential, so prepare weapons, armor, and healing foods. Given the perishable nature of sanity-restoring foods, crafting a Bundle Wrap obtained by defeating the Bee Queen is very useful. The Top Hat dropped by the Bearger and the Bearger’s crafting material, the Bearger Pelt, are also excellent choices.
Make sure to bring along a couple of science items, which will be immediately useful once underground.
It is advisable to explore during summer as the temperature in the caves never goes above 70 degrees, and there is no risk of spontaneous combustion or sinkhole generation like on the surface. On the flip side, the Depths Worms will create cave-ins underground, but they pose little threat.
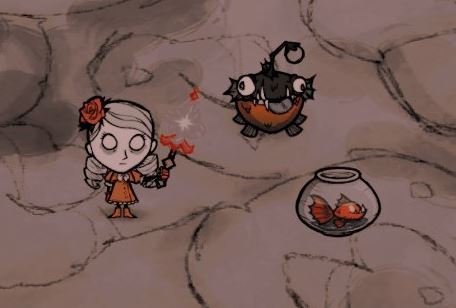
The Eyebone and Chester cannot accompany you underground; instead, you’ll find the Star-Sky and Hashi down below. Similarly, Hashi can transform as well:
Precondition: Place Light Bulbs/Glow Berries in his inventory to make him glow, albeit with a smaller light radius than a Lantern;
Precondition: Drop a Spear/Combat Spear near him to transform into the Quill Hedgehog Hashi, dealing 30 damage to attackers at the cost of some Spear durability;
Precondition: Drop a Musical Instrument nearby to turn into the Music Box Hashi, gaining a +40/min sanity aura while consuming the instrument normally.
World Features
Cave time aligns with the surface time, but all times remain dark, with some creatures and structures emitting light naturally. Fissures will illuminate a small area during daylight.
In addition to this, caves have their own Nightmare Cycle: Nightmare-Rise-Calm. During the Rise phase, Shadow Creatures become active, and many areas become more dangerous. Crafting a Thulecite Medallion in the Ancient Pseudoscience Station can help monitor this cycle.
Character sanity depletes at a rate of 5/min in the caves, resulting in a loss of 40 points per day.
Periodic earthquakes occur in the caves, dropping minerals and causing damage to players. Watch your step! Explosions can shorten the earthquake cooldown time.
Worm attacks are replaced by Depths Worm attacks, featuring higher health and attack power. However, they are not significantly more challenging to deal with compared to Hound attacks.
There are four pairs of Large Tentacles in the world; defeating them reveals Large Sinkholes, similar to the wormholes on the surface, allowing for mutual transportation. There is an extra Large Tentacle that, when defeated, teleports you to the Ruins entrance area.
World Generation and Exploration Guide
Caves (the underground) offer a different world from the Forest (the underground), with many interconnections between them, unique mechanisms, increased dangers, more treasures, and more adventures.
Several Blocked Sinkholes are randomly distributed on the mainland, each corresponding to a staircase leading underground. Digging them open with a Pickaxe will reveal entrances to the caves and also serve as Bat Habitats. Six bats will emerge at dusk until returning home at dawn. Therefore, it is not recommended to build a base too close to the caves; it’s better to keep a screen’s distance away.
After clicking on an entrance, a brief loading screen will take you underground; clicking on a Staircase will return you to the surface.
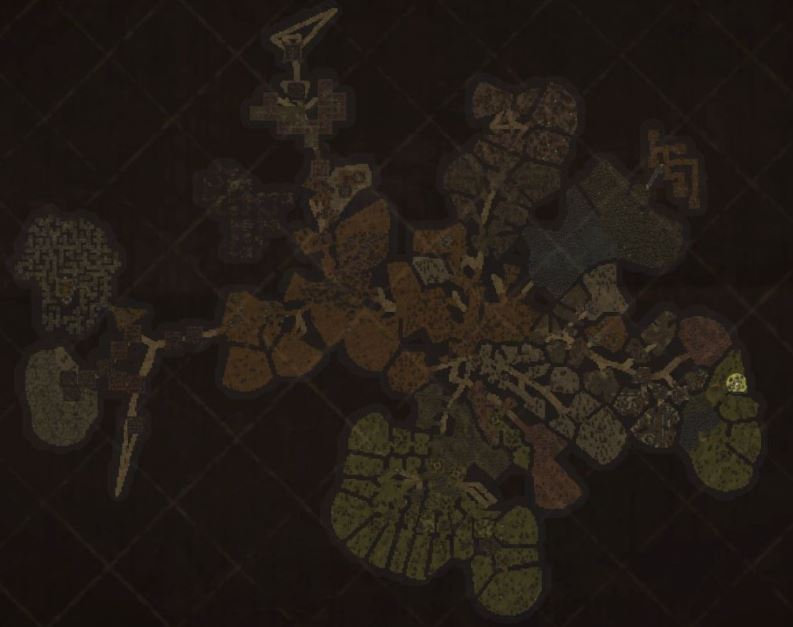
Using the full map view helps analyze cave terrain.
Tall Grass Biome
Covering a large area at my location is Tall Grass, marking the entrance to the caves where all entrances are typically found, usually two near the spawn point.
This biome resembles the surface Tall Grass biome, offering safety, abundant basic resources (grass, twigs, logs), but lacking in food. The Rabbit Hutch, generating Bunnymen, can be found here. They venture out during dusk and night, are neutral creatures with group aggression, attacking players carrying meat. Disassembling their homes yields 2 Boards, 2 Bunny Puffs, and 5 Carrots each without inciting aggression.
Mushroom Forest
Heading towards the world center, you will encounter a forest composed of ordinary Mushroom Trees. These come in blue, green, and red varieties, with the forest hosting a mix of blue, green, red, and sporecap varieties. Mushroom trees drop items like regular trees, except they give mushrooms instead of seeds of the corresponding color.
Mushrooms are convenient supplements for various statuses, with the following attributes for each color (Hunger/Sanity/Health):
Green Mushroom: +12.5/-50/0, weaponized on Lunar Island
Cooked Green Mushroom: 0/+15/-1, emergency sanity restoration
Blue Mushroom: +12.5/-15/+20, emergency health restoration
Cooked Blue Mushroom: 0/+10/-3
Red Mushroom: +12.5/0/-20, attracts Werepigs
Cooked Red Mushroom: 0/-10/+1
At the junction between the spawn point and the Mushroom Forest, you’ll find Rabbit Warrens spawning Rock Rabbits. They venture out during dusk and night with neutral behavior but have group hostility. It is advised to avoid provoking them. In general, dismantling their homes drops 2 Boards, 2 Bunny Puffs, and 5 Carrots each without incurring hostility.
Stalagmite and Mineral Zones
Continuing towards the world center, you’ll discover Stalagmite and Mineral Zones. The former features abundant Stalagmites, Bat Caves, and Cracks. Aside from dropping Rocks, Flint, and Gold Nuggets, Stalagmites can also randomly yield Fossil Fragments. During the Rise phase, Cracks will spawn Nightmares.
The Mineral Zone is rich in Rocks, and Snurtle Mounds appear here. These mounds house 1-2 Snurtles and have a 10% chance to spawn the variation known as Slurtle. These neutral creatures prioritize eating minerals on the ground and will attack players carrying minerals secondarily, knocking one loose. While the loot is lackluster, handling them poses a higher difficulty.
Snurtle:
1200 Health; 25 Attack
Drops: Snurtle Slime*2, Low-tier Gunpowder
Shellmet*10%, 525 Durability, 90% Defense
Shard*90%, Used for crafting Seed Packets
Combat: Retreating into its shell after taking 150 successive damage, gaining 95% damage reduction, then quickly retaliating upon emergence. The most efficient and safe approach involves hitting it, waiting for it to retract, retreating, and repeating the process. Due to its slow attack speed, tanking hits is viable, but dodging its retaliatory strike is challenging.
Slurtle:
200 Health; 0 Attack (only flees from the player)
Drops: Snurtle Slime*2
Snurtle Shell Armor*75%, 1050 Durability, 60% Durability. Right-click to retract for immunity and end aggro after 5 seconds, upgraded to thulicite crown.
Shard*25%
Combat: Don’t slack off on attacks.
Additionally, Stone Lobsters may appear in this area, available for hire using minerals. They boast high health and attack values, can retreat into their shells after consecutive attacks for 95% damage reduction and self-healing at 10/s, making them formidable opponents. It’s not recommended to enrage them, as even a solo battle proves difficult, yielding only a single Meat, two Stones, and Flint. Hiring them is highly suggested for clearing out most creatures effectively.
Frog Caverns
Further along the branching path, you’ll encounter Boss-exclusive terrains covered in Guano Turf. In the central area of the three ponds lies the perennial boss Toadstool. Adjacent to it are several Glowing Mushrooms, presenting a challenging boss fight (convenient to escape but time-consuming) with little practical use for new players in terms of loot. The location is marked on the map and can be revisited later for completion.
Glowcap/Mud Plains:
This area serves as the world’s hub where all terrains converge. Abounding in Glowing Flowers, moving forward from this spot leads to increased dangers. This location acts as the boundary between the caves, signaling the majority of treasures reside ahead.
Within the Mud Plains, a new perennial boss, Misery Toadstool, appears. Its drops can be used to craft the Desperation Set, which slowly restores durability.
Initially, players cannot trigger combat conditions here (requires the Multi-Tool Axe to break free and produce it at the Ancient Pseudoscience Station). Hence, we will pass over this boss for now.
After a short respite, players are geared up for the dangerous journey ahead.